Create Your First ASP.NET Core MVC Application
In this tutorial you will build your first ASP.NET Core MVC application from scratch. You'll create the project, add a model that holds employee data, a controller that prepares the data, and a view that shows it as a web page. Then you'll make it the start page of the application by changing the route in Program.cs.
By the end you will understand the most important idea in MVC: how a URL in the browser reaches your C# code, and how the data comes back as HTML. Every later lesson (CRUD with a database, validation, authentication) builds on exactly this flow.
What is MVC?
MVC stands for Model, View, Controller. It splits a web application into three parts, each with one job:
| Part | Job | In this tutorial |
|---|---|---|
| Model | The data and its shape | Employee class with Id, Name, Description and Address |
| Controller | Receives the request, gets or prepares the data, chooses the view | EmployeeController with the InsertData action |
| View | Turns the data into HTML for the browser | InsertData.cshtml showing an employee table |
Browser: GET /Employee/InsertData
        │
        ▼
Routing ──► EmployeeController.InsertData()      (Controller)
                  │ creates an Employee object   (Model)
                  ▼
            return View(employee)
                  │
                  ▼
        Views/Employee/InsertData.cshtml         (View)
                  │ fills the HTML with the data
                  ▼
Browser receives the finished HTML page
The steps we will follow:
- Create an ASP.NET Core MVC project.
- Create an
Employeemodel class. - Create an
EmployeeControllerwith anInsertDataaction method. - Create the
InsertDataview. - Make it the default page in
Program.cs. - Run the application.
Step 1: Create the project
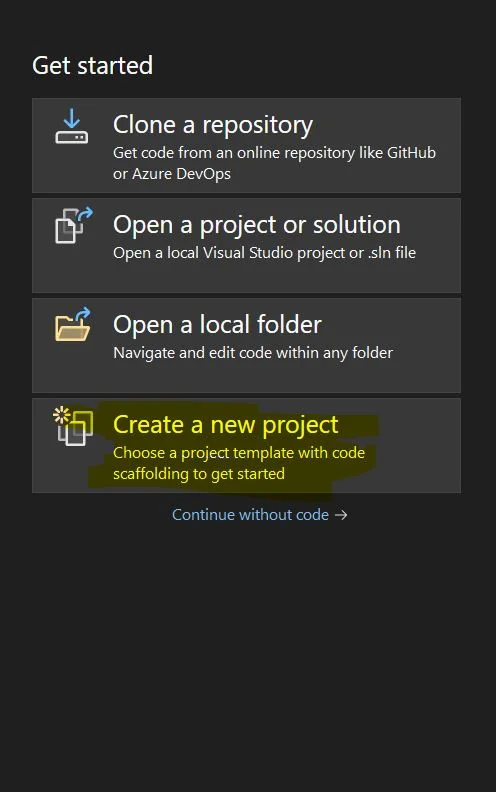
Open Visual Studio 2022 and choose Create a new project:
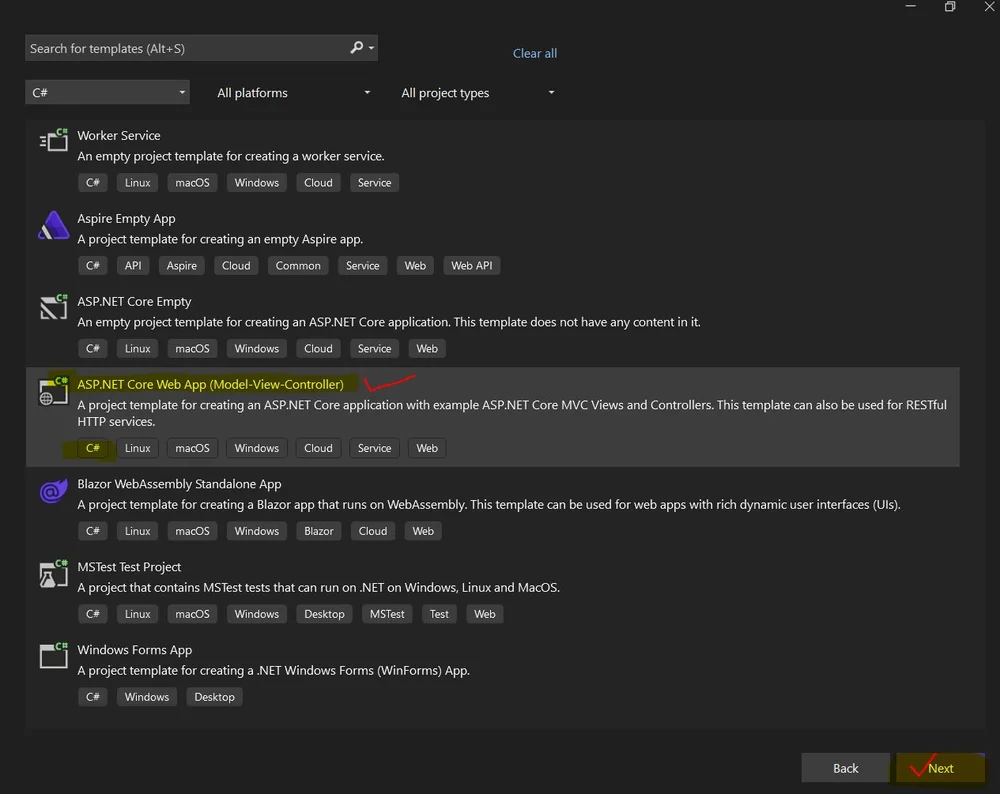
Search for and select the ASP.NET Core Web App (Model-View-Controller) template for C#, then click Next. (Be careful not to choose "ASP.NET Core Web App", which uses Razor Pages, or "ASP.NET Core Empty".)
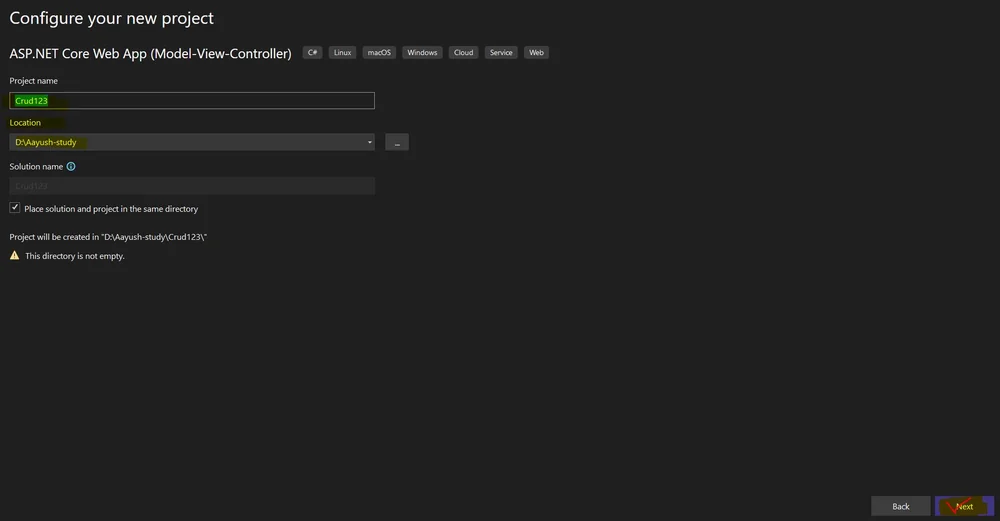
Give the project a name and choose a location:
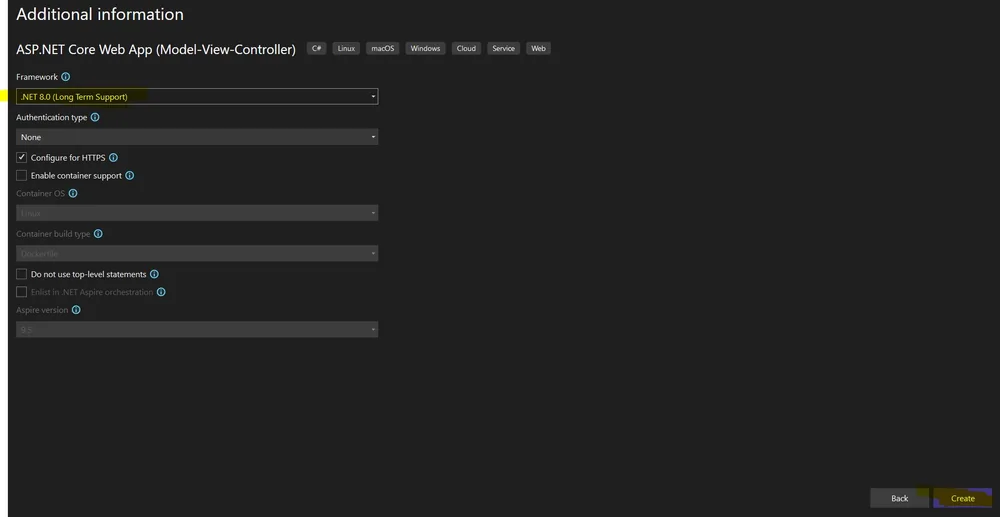
In Additional information, choose .NET 8.0 (Long Term Support), keep Authentication type: None and Configure for HTTPS checked, then click Create:
Prefer the command line? The same project can be created with the .NET CLI:
dotnet new mvc -n FirstMvcApp -f net8.0
then open the folder in Visual Studio or VS Code. This tutorial was tested with exactly that command.
The project structure
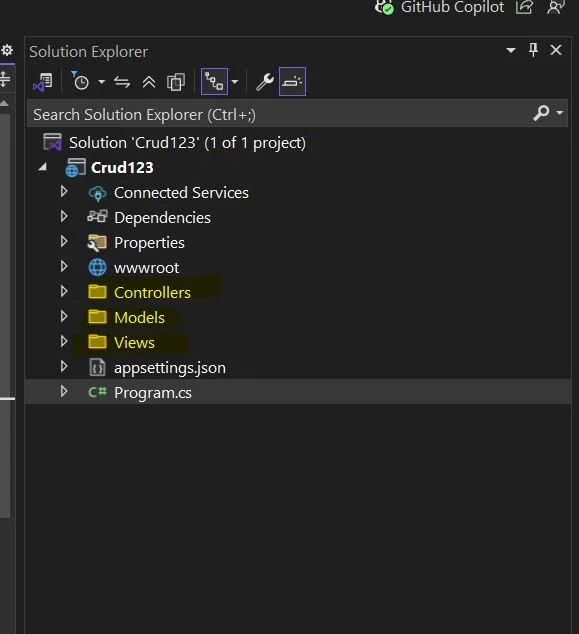
FirstMvcApp/
├── Controllers/        controllers (HomeController.cs is created for you)
├── Models/             model classes
├── Views/
│   ├── Home/           views of HomeController
│   ├── Shared/         _Layout.cshtml (the common page frame), error page
│   ├── _ViewImports.cshtml
│   └── _ViewStart.cshtml
├── wwwroot/            static files: CSS, JavaScript, images, Bootstrap
├── appsettings.json    configuration
└── Program.cs          app start-up: services, middleware and routes
The template already includes Bootstrap for styling and a working HomeController. You don't need to install any NuGet packages for this tutorial; packages such as Entity Framework Core are added later, when you connect to a database.
Step 2: Create the model
Right-click the Models folder, choose Add > Class, and name it Employee.cs:
namespace FirstMvcApp.Models
{
    public class Employee
    {
        public int EmpId { get; set; }
        public string Name { get; set; } = string.Empty;
        public string Description { get; set; } = string.Empty;
        public string Address { get; set; } = string.Empty;
    }
}
A model is a plain C# class. The = string.Empty initialisers make sure the text properties are never null, which also avoids nullable warnings in .NET 8 projects.
Step 3: Create the controller and action method
Right-click the Controllers folder and choose Add > Controller...:
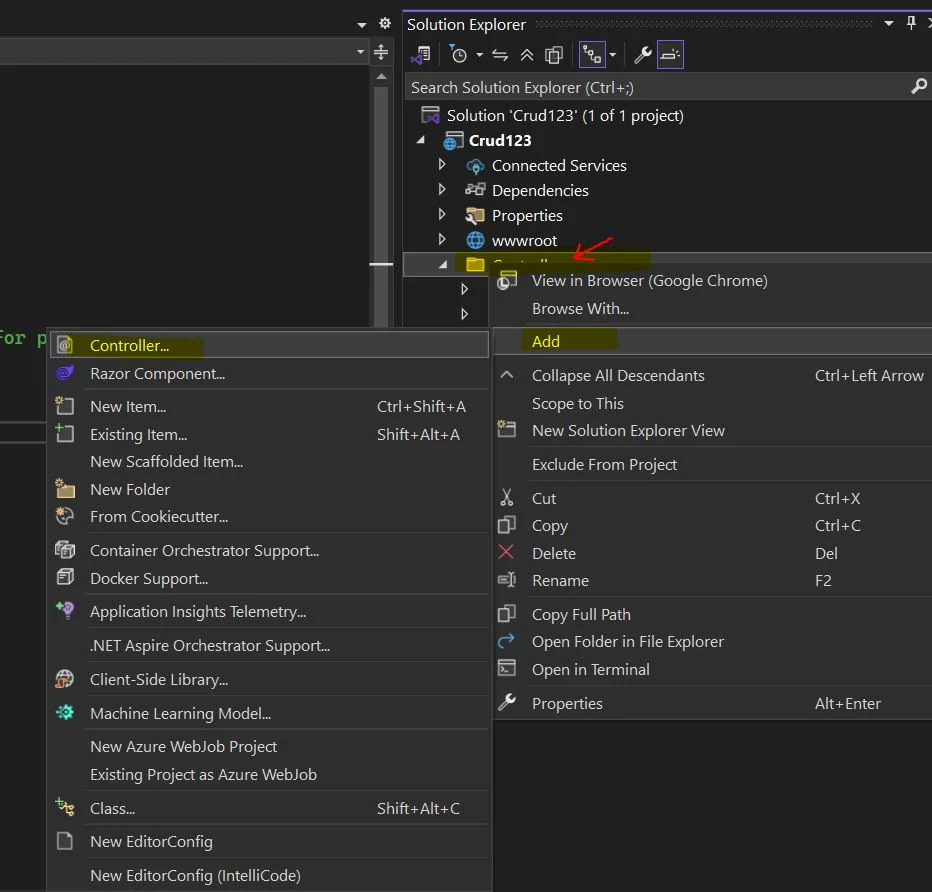
Choose MVC Controller - Empty and name it EmployeeController. Controller class names must end with Controller; in URLs this ending is left out (/Employee). Add an action method named InsertData:
using FirstMvcApp.Models;
using Microsoft.AspNetCore.Mvc;

namespace FirstMvcApp.Controllers
{
    public class EmployeeController : Controller
    {
        public IActionResult InsertData()
        {
            Employee employee = new Employee
            {
                EmpId = 1007,
                Name = "Sudheer Singh Chouhan",
                Description = "Technical Project Manager",
                Address = "Bapat Square Indore"
            };

            return View(employee);     // send the model to the view
        }
    }
}- An action method is a public method of a controller that handles a request. Its URL is
/{controller}/{action}, so this one is/Employee/InsertData. - Here we create the employee in code. In a real application this data would come from a database, which is the next lesson: MVC CRUD with ADO.NET.
return View(employee)tells MVC: "render the view for this action, and give it this object as its model".
Step 4: Create the view
Right-click inside the InsertData method and choose Add View... > Razor View - Empty, or create the file yourself. It must be saved as Views/Employee/InsertData.cshtml: MVC finds views by convention, in a folder named after the controller with a file named after the action.
@model FirstMvcApp.Models.Employee
@{
    ViewData["Title"] = "Employee Details";
}

<div class="container mt-5">
    <div class="card shadow-lg border-0 rounded-3">
        <div class="card-header bg-primary text-white">
            <h3 class="mb-0">@ViewData["Title"]</h3>
        </div>
        <div class="card-body">
            <table class="table table-bordered table-striped">
                <tbody>
                    <tr><th scope="row">Employee Id</th><td>@Model.EmpId</td></tr>
                    <tr><th scope="row">Employee Name</th><td>@Model.Name</td></tr>
                    <tr><th scope="row">Employee Description</th><td>@Model.Description</td></tr>
                    <tr><th scope="row">Employee Address</th><td>@Model.Address</td></tr>
                </tbody>
            </table>
        </div>
        <div class="card-footer text-end">
            <a href="/" class="btn btn-secondary">Back to Home</a>
        </div>
    </div>
</div>
@model FirstMvcApp.Models.Employeemakes this a strongly typed view:Modelis anEmployee, so Visual Studio gives you IntelliSense and the compiler checks property names.@Model.Namewrites the value into the HTML. Razor automatically HTML-encodes it, which protects against script injection.ViewData["Title"]is read by the shared_Layout.cshtmlto set the browser tab title. See ViewBag, ViewData and TempData.- The CSS classes (
card,table-striped,btn) come from Bootstrap, which the template already includes.
Step 5: Make it the default page in Program.cs
At this point the page already works at /Employee/InsertData. To make it open automatically when the app starts, change the default route in Program.cs. The only line that changes is the pattern:
var builder = WebApplication.CreateBuilder(args);

// Add services to the container.
builder.Services.AddControllersWithViews();

var app = builder.Build();

// Configure the HTTP request pipeline.
if (!app.Environment.IsDevelopment())
{
    app.UseExceptionHandler("/Home/Error");
    app.UseHsts();
}

app.UseHttpsRedirection();
app.UseStaticFiles();

app.UseRouting();

app.UseAuthorization();

app.MapControllerRoute(
    name: "default",
    pattern: "{controller=Employee}/{action=InsertData}/{id?}");   // was: {controller=Home}/{action=Index}/{id?}

app.Run();AddControllersWithViews()registers MVC: controllers plus Razor views.UseStaticFiles()serves CSS, JavaScript and images fromwwwroot.- In
{controller=Employee}/{action=InsertData}/{id?}, the values after=are defaults, used when the URL doesn't contain them. So the bare URL/now means Employee > InsertData. The{id?}part is an optional id. Routing is explained in detail in Routing in ASP.NET Core MVC.
Step 6: Run the application
Press F5 (or Ctrl + F5 to run without debugging), or run dotnet run in the project folder. The browser opens the start page:
| Employee Id | 1007 |
|---|---|
| Employee Name | Sudheer Singh Chouhan |
| Employee Description | Technical Project Manager |
| Employee Address | Bapat Square Indore |
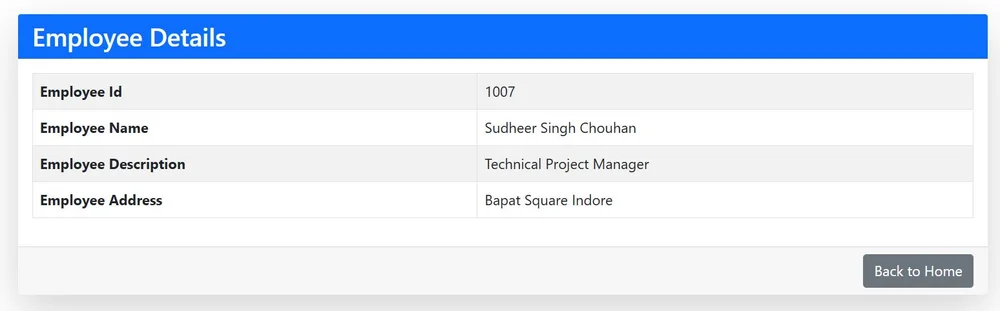
When we tested the app, all of these URLs returned this same page:
| URL | Result | Why |
|---|---|---|
/ | Employee Details | Both route defaults are used |
/Employee/InsertData | Employee Details | Controller and action given in the URL |
/employee/insertdata | Employee Details | Route matching is not case-sensitive |
/Home/Index | The template's welcome page | HomeController still exists; only the default changed |
The browser tab shows "Employee Details - FirstMvcApp": the view set ViewData["Title"], and the layout added the application name.
Small catch: because / now opens the employee page, the Back to Home button (href="/") just reloads the same page. To link to the template's home page instead, use the anchor tag helper: <a asp-controller="Home" asp-action="Index">Back to Home</a>. Tag helpers build the URL from your routes, so links never break when routes change.
Common errors
| Error | Cause | Fix |
|---|---|---|
| InvalidOperationException: The view 'InsertData' was not found. The following locations were searched: /Views/Employee/InsertData.cshtml, /Views/Shared/InsertData.cshtml | The view is in the wrong folder or has a different name | Save it as Views/Employee/InsertData.cshtml, matching controller and action names |
NullReferenceException on @Model.Name | The action called return View(); without passing the employee | Use return View(employee); |
| 404 Not Found | Typo in the URL or controller name, or the class doesn't end with "Controller" | Check the class name EmployeeController and the URL /Employee/InsertData |
| The welcome page opens instead of the employee page | The default route in Program.cs wasn't changed or saved | Set {controller=Employee}/{action=InsertData}/{id?} |
What you learned
- MVC splits an app into a Model (data), a Controller (request handling) and a View (HTML).
- A request to
/Employee/InsertDatarunsEmployeeController.InsertData(). return View(model)rendersViews/Employee/InsertData.cshtmlwith that model.@modelmakes a strongly typed view;@Model.Propertyoutputs values safely.- The default route in
Program.csdecides which page/opens.
Next: load employees from SQL Server in MVC CRUD with ADO.NET, and pass data with a ViewModel.