Create Your First React Project
React is a JavaScript library for building user interfaces out of small, reusable pieces called components. It is the most popular choice for the front end of applications whose back end is an ASP.NET Core Web API: React runs in the browser, shows the screens, and calls your API for data.
In this lesson you will set up your computer, create a React project, run it, understand every important file, and write your own first component. Then you'll be ready for React Hooks and React CRUD with an ASP.NET Core Web API.
Important: many older tutorials (including the first version of this page) use npx create-react-app. The React team deprecated create-react-app in February 2025, and it is no longer recommended for new projects. Today, a plain React app is usually created with Vite, a fast build tool. This page uses Vite, and the section at the end explains create-react-app for when you meet it in older projects.
Step 1: Install Node.js
React projects are built with tools that run on Node.js, and packages are installed with npm (Node Package Manager), which comes with Node.js.
- Download the LTS (Long Term Support) version from the official Node.js website and install it with the default options.
- Open a new Command Prompt or PowerShell window (an old window won't see the new installation) and check the versions:
node -v
npm -v
If both commands print a version number, you are ready. If you see "'node' is not recognized as an internal or external command", Node.js isn't installed or the terminal was opened before installation; close it and open a new one.
Step 2: Create the project with Vite
Create a folder for your React projects, for example E:\ReactProjects, open a terminal in it, and run:
cd E:\ReactProjects
npm create vite@latest my-first-react-app -- --template react
npm create vite@latestdownloads and runs the latest project generator of Vite.my-first-react-appis the project and folder name. Use lowercase letters and dashes: npm package names cannot contain capital letters.--template reactchooses plain React with JavaScript. Usereact-tsif you want TypeScript.
If you leave out the name or template, Vite simply asks you for them in the terminal. Depending on your npm version, it may also ask whether to install packages and start the app straight away.
Step 3: Install packages and run the app
cd my-first-react-app
npm install
npm run dev
npm installdownloads all the libraries listed inpackage.jsoninto anode_modulesfolder. This takes a minute the first time.npm run devstarts the Vite development server. It prints a local address, by defaulthttp://localhost:5173/. Open it in your browser to see the starter page with a counter button.
Leave this terminal running while you work. Every time you save a file, the browser updates instantly (this is called Hot Module Replacement). Press Ctrl + C in the terminal to stop the server.
To open the project in Visual Studio Code, run this from the project folder:
code .Step 4: Understand the project structure
my-first-react-app/
├── node_modules/        installed libraries (never edit, never commit to Git)
├── public/              files copied as-is (icons, images)
├── src/
│   ├── assets/          images imported from code
│   ├── App.css          styles for the App component
│   ├── App.jsx          the main component: start editing here
│   ├── index.css        global styles
│   └── main.jsx         entry point: puts <App /> into the page
├── index.html           the single HTML page of the app
├── package.json         project name, scripts and dependencies
└── vite.config.js       Vite settings
index.html: the one and only page
A React app is a Single Page Application (SPA). There is just one HTML file, and it contains an almost empty element:
<div id="root"></div>
<script type="module" src="/src/main.jsx"></script>
Everything you see on screen is drawn inside that root element by React.
main.jsx: where React starts
import { StrictMode } from 'react'
import { createRoot } from 'react-dom/client'
import './index.css'
import App from './App.jsx'

createRoot(document.getElementById('root')).render(
  <StrictMode>
    <App />
  </StrictMode>,
)createRoot(...)connects React to the<div id="root">inindex.html..render(<App />)draws theAppcomponent inside it.StrictModeis a development helper that warns about common mistakes. It doesn't show anything on screen.
package.json: scripts
| Command | What it does |
|---|---|
npm run dev | Starts the development server with instant reload |
npm run build | Creates an optimised production version in the dist folder |
npm run preview | Serves the dist folder locally, to test the production build |
npm run lint | Checks the code for common problems (ESLint) |
Step 5: Write your first component
A component is a JavaScript function that returns what should appear on screen, written in JSX: HTML-like syntax inside JavaScript. Replace everything in src/App.jsx with this small "course progress" app:
import { useState } from 'react'
import './App.css'

// A reusable component: receives data through "props"
function CourseCard({ title, lessons, level }) {
  return (
    <div className="course-card">
      <h2>{title}</h2>
      <p>{lessons} lessons · {level}</p>
    </div>
  )
}

function App() {
  // State: a value React remembers; changing it re-draws the screen
  const [completed, setCompleted] = useState(0)

  const courses = [
    { id: 1, title: 'C# Fundamentals', lessons: 20, level: 'Beginner' },
    { id: 2, title: 'ASP.NET Core Web API', lessons: 12, level: 'Intermediate' },
    { id: 3, title: 'SQL Server', lessons: 40, level: 'Beginner to Advanced' },
  ]

  return (
    <main>
      <h1>My Learning Dashboard</h1>

      <p>Lessons completed today: {completed}</p>
      <button onClick={() => setCompleted(completed + 1)}>I finished a lesson</button>

      {courses.map(course => (
        <CourseCard key={course.id} title={course.title}
                    lessons={course.lessons} level={course.level} />
      ))}
    </main>
  )
}

export default App
Save the file and look at the browser: you'll see the heading, the counter and three course cards. Click the button and the number goes up without reloading the page.
What this small example teaches:
- Components are functions whose names start with a capital letter (
App,CourseCard). You use them like HTML tags:<CourseCard />. - Props pass data into a component, like method parameters:
title,lessons,level. - State (
useState) holds data that changes. CallingsetCompletedtells React to draw the screen again with the new value. - Lists are drawn with
.map(), and each item needs a uniquekeyso React can track it. - Curly braces
{ }put JavaScript values inside JSX.
JSX rules that trip up beginners
| HTML | JSX | Why |
|---|---|---|
class="card" | className="card" | class is a reserved word in JavaScript |
onclick="..." | onClick={handler} | Events are camelCase and take a function |
<br>, <img src="x"> | <br />, <img src="x" /> | Every tag must be closed |
| Several top-level elements | Wrap them in one parent or <> ... </> | A component returns a single root element |
style="color: red" | style={{ color: 'red' }} | Styles are a JavaScript object |
Step 6: Build for production
npm run buildVite creates a dist folder with an index.html and optimised, minified JavaScript and CSS files. These are plain static files: you can host them on any web server, a CDN, or inside the wwwroot folder of an ASP.NET Core application.
Calling your ASP.NET Core API: during development, React runs on localhost:5173 and your API on another port, so the browser will block the calls unless the API enables CORS for the React address (builder.Services.AddCors(...) and app.UseCors(...)). This is covered in React CRUD with Web API.
Common setup errors
| Error | Cause | Fix |
|---|---|---|
| 'npm' is not recognized... | Node.js not installed, or an old terminal window | Install Node.js LTS and open a new terminal |
| npm.ps1 cannot be loaded because running scripts is disabled on this system | PowerShell's execution policy blocks npm's script | Use Command Prompt, or run Set-ExecutionPolicy -Scope CurrentUser RemoteSigned in PowerShell |
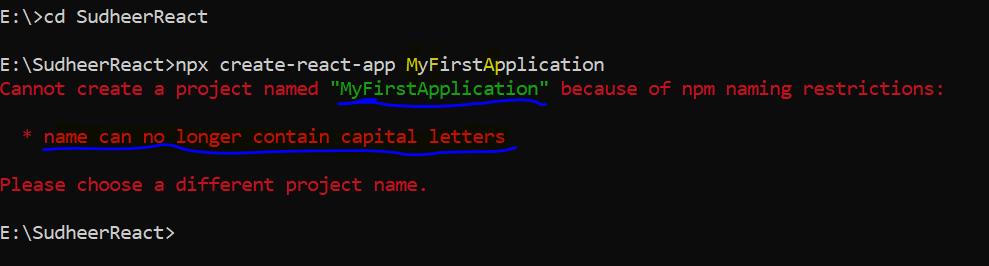
| name can no longer contain capital letters | npm package names must be lowercase | Use a name like my-first-react-app |
| Port 5173 is already in use | Another dev server is running | Vite automatically tries the next port; check the address it prints |
| Blank page, error in the browser console | A JavaScript or JSX error in your component | Press F12, read the Console tab; the error names the file and line |
Older projects: create-react-app
You will still find many projects and tutorials created with create-react-app (CRA), so it's useful to recognise it. A CRA project was created like this:
npx create-react-app myfirstapplication
cd myfirstapplication
npm start
Using capital letters in the name fails with a clear message, the same npm naming rule as above:
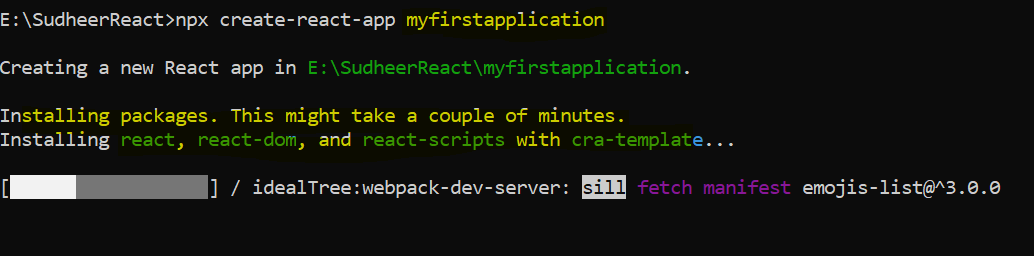
With a lowercase name, CRA installs react, react-dom and react-scripts:
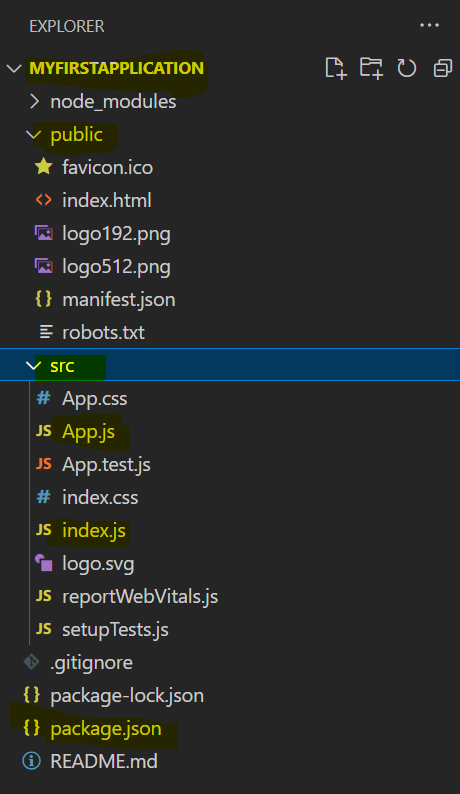
And the project structure looked like this in Visual Studio Code:
create-react-app vs Vite
| create-react-app (deprecated) | Vite | |
|---|---|---|
| Create | npx create-react-app name | npm create vite@latest name -- --template react |
| Run in development | npm start (port 3000) | npm run dev (port 5173) |
| Production build folder | build | dist |
| Location of index.html | public/index.html | Project root |
| Entry file | src/index.js | src/main.jsx |
| Environment variables | REACT_APP_ prefix | VITE_ prefix (import.meta.env) |
| Speed | Slow start on big projects (webpack) | Starts almost instantly |
The React code itself (components, props, state, hooks) is the same in both. Only the tooling around it differs. Existing CRA projects keep working, and can be migrated to Vite when convenient.
Summary
- Install Node.js LTS, then create a React app with
npm create vite@latest name -- --template react. - Run
npm installonce, thennpm run dev, and openhttp://localhost:5173. index.htmlhas onerootelement;main.jsxrenders<App />into it.- Components are capitalised functions returning JSX; props pass data in;
useStateholds changing data. npm run buildproduces static files indistthat any server, including ASP.NET Core, can host.- create-react-app is deprecated; recognise it in old projects, but use Vite for new ones.
Next: Hooks in React.